Tag Archives: WordPress

Improving the Advanced Custom Fields workflow with ACF Theme Code

Advanced Custom Fields (ACF) is a brilliant and hugely popular plugin for creating custom fields in WordPress.

Problem

Problem Emoji

WordPress developers who regularly work with ACF know that it can be repetitious and time-consuming to implement your custom fields in a theme. Especially if you’re working on a more complex project that utilises powerful ACF features like the Flexible Content field.

Many developers have created their own code snippets to help speed up this workflow. But with so many different field types and return formats available with ACF, remembering the appropriate snippet shortcut can become an issue. If you don’t have a relevant snippet, you’ll most likely end up searching the ACF documentation for code examples.

Then your snippet needs to be customised with your project’s unique field names. At this point it’s not uncommon to forget the field name, was it profile_image or profile_photo ? You’ve also got to remember how you set that field to be returned, was it ID, URL or Array? So you end up constantly referring back to your field group settings to get these details.

Solution

solution-emoji

To solve this workflow issue, Aaron Rutley and I have created the ACF Theme Code WordPress plugin.

This plugin generates the code required to implement your unique Advanced Custom Fields in a WordPress theme.

The code generated is based on the official ACF documentation, includes your custom field names and reflects your return format settings.

Whenever you publish, edit or update an ACF Field Group, the code required to implement each field is conveniently displayed for you in a Theme Code section, below the field group settings.

ACF Theme Code screenshot

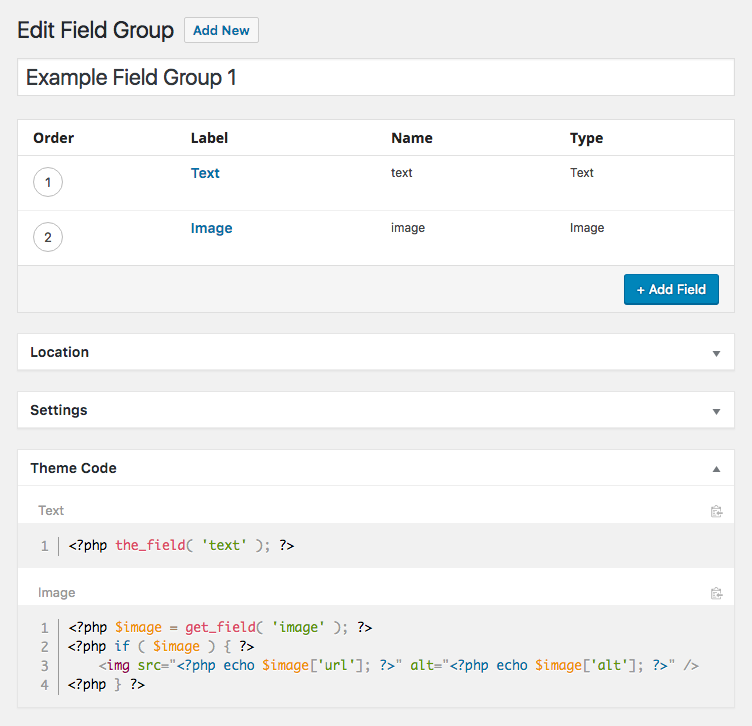
We’ve also included a clipboard feature so you can easily copy these code blocks and paste them into your theme.

ACF Theme Code supports all the ACF basic fields types including all their various return formats.

  • Text
  • Text Area
  • Number
  • Email
  • Password
  • WYSIWYG
  • File (Object, URL and ID)
  • Image (Object, URL and ID)
  • Select (single and multiple)
  • Checkbox
  • Radio
  • True / False
  • User
  • Google Map
  • Date Picker
  • Colour Picker
  • Page Link (single and multiple)
  • Post Object (single and multiple)
  • Relationship (Object and ID)
  • Taxonomy (Checkbox, Multi Select, Radio Buttons and Select field types)


ACF Theme Code Pro

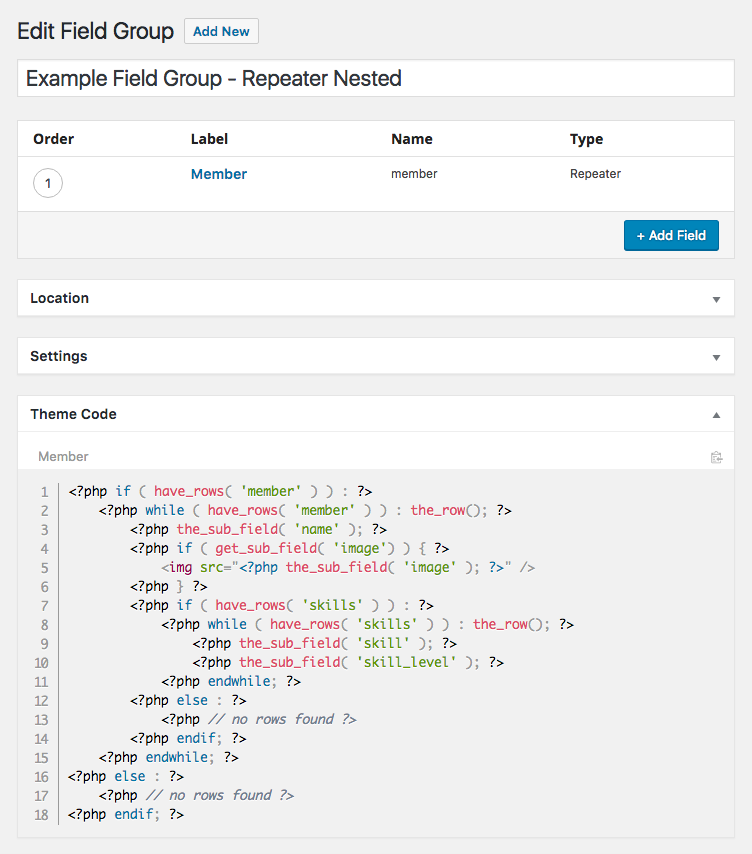
The premium version of our plugin, ACF Theme Code Pro, also generates code for the powerful Flexible Content, Repeater, Gallery and Clone fields available in the Advanced Custom Fields PRO plugin.

This is where ACF Theme Code becomes especially useful.

ACF Theme Code Pro screenshot

ACF Theme Code Pro also supports these popular third party add-on fields for ACF.

Here is a brief video Aaron recently created to demonstrate some of the plugin features.

Feedback

The response so far to ACF Theme Code has been overwhelmingly positive and I am very grateful to Aaron Rutley for the opportunity to work together. It’s been a fun challenge to help develop his concepts for the plugin.

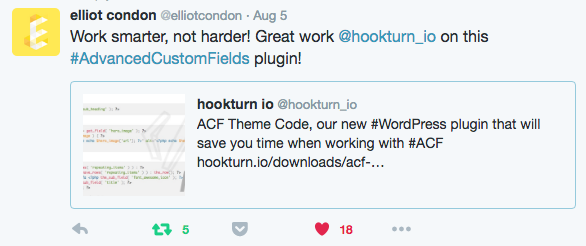
Elliot Condon, the talented creator of Advanced Custom Fields, was kind enough to tweet about our plugin and feature us on advancedcustomfields.com.

Elliot Tweet

ACF Add Ons

WP Loop was also good enough to write a review of our plugin.

More information is available at wordpress.org and hookturn.io.

Customizing the “New User Registration” and “Your username and password” email notifications sent by WordPress

Update (27/11/2020)

You can now use this method.

<?php
// Disable New User Registration email sent to Admin
add_action( 'init', function() {

	remove_action( 'register_new_user', 'wp_send_new_user_notifications' );
	remove_action( 'edit_user_created_user', 'wp_send_new_user_notifications', 10, 2 );
	
	add_action( 'register_new_user', 'bp_send_new_user_notifications' );
	add_action( 'edit_user_created_user', 'bp_send_new_user_notifications', 10, 2 );
	
} );

function bp_send_new_user_notifications( $user_id, $notify = 'user' ) {
	wp_new_user_notification( $user_id, null, $notify );
}
?>


Reference: https://wordpress.stackexchange.com/questions/236122/turn-off-new-user-registration-emails/236301#236301


Original Post

When a new user is registered, WordPress sends a New User Registration notification to the admin email address in the site’s General Settings. A Your username and password email is also sent to the new user.

This functionality is handled by wp_new_user_notification() located in wp-includes/pluggable.php.

<?php
if ( !function_exists('wp_new_user_notification') ) :
/**
* Notify the blog admin of a new user, normally via email.
*
* @since 2.0
*
* @param int $user_id User ID
* @param string $plaintext_pass Optional. The user's plaintext password
*/
function wp_new_user_notification($user_id, $plaintext_pass = '') {
    $user = get_userdata( $user_id );

    // The blogname option is escaped with esc_html on the way into the database in sanitize_option
    // we want to reverse this for the plain text arena of emails.
    $blogname = wp_specialchars_decode(get_option('blogname'), ENT_QUOTES);

    $message = sprintf(__('New user registration on your site %s:'), $blogname) . "\r\n\r\n";
    $message .= sprintf(__('Username: %s'), $user->user_login) . "\r\n\r\n";
    $message .= sprintf(__('E-mail: %s'), $user->user_email) . "\r\n";

    @wp_mail(get_option('admin_email'), sprintf(__('[%s] New User Registration'), $blogname), $message);

    if ( empty($plaintext_pass) )
        return;

    $message = sprintf(__('Username: %s'), $user->user_login) . "\r\n";
    $message .= sprintf(__('Password: %s'), $plaintext_pass) . "\r\n";
    $message .= wp_login_url() . "\r\n";

    wp_mail($user->user_email, sprintf(__('[%s] Your username and password'), $blogname), $message);

}
endif;
?>


This is a pluggable function so it can be customized by redefining it . Unfortunately redefining it in your theme has no effect, it needs to be replaced via a plugin.

It seems that plugins are loaded first, then pluggable.php, then the theme. So if your function override is in your theme, you’ll clash with the default function. – Steve Taylor

Here’s a quick plugin template for customizing the notifications.

<?php
/**
 * Plugin Name: Custom New User Notifications
 * Description: Customize the "New User Registration" and "Your username and password" notifications
 * Version: 1.0
 * Author: Ben Pearson
 * Author URI: http://benpearson.com.au
 */

if ( !function_exists('wp_new_user_notification') ) :
/**
 * Notify the blog admin of a new user, normally via email.
 *
 * @since 2.0
 *
 * @param int $user_id User ID
 * @param string $plaintext_pass Optional. The user's plaintext password
 */
function wp_new_user_notification($user_id, $plaintext_pass = '') {
    $user = get_userdata( $user_id );

    // The blogname option is escaped with esc_html on the way into the database in sanitize_option
    // we want to reverse this for the plain text arena of emails.
    $blogname = wp_specialchars_decode(get_option('blogname'), ENT_QUOTES);

    $message  = sprintf(__('New user registration on your site %s:'), $blogname) . "\r\n\r\n";
    $message .= sprintf(__('Username: %s'), $user->user_login) . "\r\n\r\n";
    $message .= sprintf(__('E-mail: %s'), $user->user_email) . "\r\n";

    @wp_mail(get_option('admin_email'), sprintf(__('[%s] New User Registration'), $blogname), $message);

    if ( empty($plaintext_pass) )
        return;

    $message  = sprintf(__('Username: %s'), $user->user_login) . "\r\n";
    $message .= sprintf(__('Password: %s'), $plaintext_pass) . "\r\n";
    $message .= wp_login_url() . "\r\n";

    wp_mail($user->user_email, sprintf(__('[%s] Your username and password'), $blogname), $message);

}
endif;
?>

Include the function_exists() check it’s wrapped in. If you include this, your function will still get priority over the WP core; it’ll just prevent fatal errors if you activate a plugin that happens to have overridden the same function. – Steve Taylor

Resources

Notes on “Managing a Freelance WordPress Development Business” by Bill Erickson

These are my reference notes on Bill Erickson’s excellent presentation at WordCamp Austin 2012, entitled Managing a Freelance WordPress Development Business.

Many thanks to Bill for sharing his knowledge and experience. These notes are posted here with his approval.

Links


Introduction

  • Bill starts 2-4 projects a week
  • He has about 20 projects active at any one time


Qualify your prospects

  • Use multiple layers of filters to minimize the number of people that contact you that you won’t actually end up working with. Especially people with little or no budget.
  • Post estimated price next to every portfolio item. “A similar project would cost X”. When you increase rates, increase these figures. Bill doesn’t appear to do this on his website anymore.
  • Post a project minimum on your website. This gets people used to how much your pricing is so they have an understanding of this when they contact you. Bill’s minimum was $2000 a the time of this talk. It’s now $3000.
  • Use Google canned responses to assist with educating clients. Find the service that is most similar to what the inquiry is looking for and use the appropriate tweaked, canned response. For example, if they are looking for a new theme you say, “You focus strictly on development. We will need to bring on a designer. Here are estimates of what that will cost. Here is an estimate of WordPress development costs.” Then give an estimate of when you can start based on your current schedule. Then say, “If you still think we’re a good fit lets schedule a phone call”.
  • Then when you’re on the phone do work qualification. Listen to their needs. Figure out if you’re a actually a good fit for them. This is the part that takes up the most of your time.
  • Once phone call is done send them the contract.
  • Your time is not scale-able, so each of these steps is there to increase your time efficiency.
  • Drive traffic via the design of your site to the services that you most enjoy and are most profitable for you. Currently the main services Bill offers are: Design to website in 2 weeks, Mobile responsive design and Full Service (Discovery, Design and Development).
  • A Services page allows the user to self select the service they want. They are then taken to a another page with detailed information about that particular service and a contact form at the bottom. Testimonials and portfolio items are also used to good effect on Bill’s site.


Clear communication

  • You need to improve your communication because you can’t scale this time like you can with development.
  • Standardize as much of your communication as possible so that it is reusable.
  • During initial discussions use detailed canned responses for common questions eg. theme conversion, theme development or responsive web design.
  • Use a standardized quote.
  • Use clear milestones and deliveries.
  • Make sure payment is tied to milestones.
  • Bill’s standard 5 day project: Starts on Monday. Initial version is delivered on the Friday. Payment is based on these milestones too. 25% is due before project is started, to get on the schedule ie. once a client pays the 25% they are added to the schedule. Bill has now changed this timeline to 10 business days instead of 5. 
  • Once you start, charge 75% payable in 15 business days. Deliver the site in 5 days and then the client has 10 more business days before the invoice is due.
  • Allow clients to leave the site on your server as long as they like and make as many changes to the content as they want.
  • Payment is tied to project beginning and not project end.
  • The client’s time creating content is outside of your control so your payment shouldn’t be tied to that.


Quote

  • He doesn’t use a legal contract that requires signatures.
  • He’s had hundreds of clients over the past 8 years and only 2 have not paid him. It wasn’t worth trying to sue them so he just didn’t give them the website.
  • The purpose of a quote is to define what each party is responsible for so that you have a good relationship.
  • List everything you’re going to do and when you’re going to do it.
  • List what is expected from client.
  • This is an evolving document. Every time you have a problem, look at it and see what can be improved.
  • Uses Gmail canned responses for each section.


Quote Sections

Scope

  • List everything in the site that you’re going to build – “I will build a website that matches the provided design for home page and inner page.”
  • List all custom functionality eg sliders, events.

Timeline

  • Schedule projects to start on a Monday and deliver on a Friday then clients have as long as they want to make changes.

Payment Schedule

  • For larger projects, create smaller milestones and attach payment to them.

Availability

  • Important section as it protects you against lots of projects starting at the same time – “As of (today’s date) I’m available to start on (date of next available Monday). Once the initial 25% is paid, the start date will determined by my current availability.”
  • So if the client waits 3 weeks they won’t get the date in the email.
  • Also encourages clients to pay quicker.
  • Explain to client that this allows you to concentrate on their project.

Phone Calls

  • “Phone calls are limited to one hour. Phone calls exceeding that are billable at my hourly rate”
  • Most clients only want to talk on the phone for less than 1 hour. This stops you from having to pad out all quotes to cover the clients that need to talk a lot.
  • It also encourages clients respect your time.

Licensing

  • “WordPress is an open source project built by thousands of developers. Whatever I build for you, if it can help the WordPress project, I would like to contribute it either as plugins, themes, core patches or code snippets.” I would like the ability to share that. “But I will never distribute what I build for you, in whole, to anyone else.”
  • “WordPress is open source and because we are building on top of it, I expect to be able to contribute my improvements back to the community.”
  • Then you don’t have to worry about asking for permission after the fact.

Migration

  • “I will only provide free migration to the following hosts, if you prefer a host other than this you have 30 minutes of migration/troubleshooting time after which I start billing for time.”
  • This encourages clients to use fast hosts too.


Collect Data and Iterate

  • If you collect data you see what you can improve.


Genesis CRM

Fields used

  • Name
  • Email
  • Budget
  • Type of project
  • Source (how they found you)
  • Quote
  • Expenses (contractors)
  • Profit
  • Time spent on project
  • Effective hourly rate
  • Points of contact (email, phone etc)
  • Status (active project, scheduled project)
  • Include or exclude from portfolio

About the CRM

  • Allows you to see where the work you are closing is coming from so that you can focus on that source.
  • Allows you to distinguish effective inquiry sources from effective actual project sources.
  • He found that the larger the project, the less profitable it was. This is because you are less accurate with the quote.
  • Caused him to focus on smaller sites that are quicker to build and easier to quote accurately. This enable you to make more money form less projects. Bill has since changed his tactics to include larger sites again.
  • Dashboard shows all active projects with radio button that says “Needs work”. Checking it makes it a yellow box. See screenshot in slides.
  • Projects are broken down by stage and each has a text field explaining what needs to be done.
  • CRM is linked to contact form on main site using gravity forms and an iframe.


Q & A section

  • Prefers emails of phone calls. Clients will send lots of email during content population.
  • Makes scheduled phone calls between 10 and 12am. Limit number of phone calls and concentrate them into one part of the day.
  • Uses Google voice so convert phone messages to emails.
  • Designs must be provided before quote. Send preliminary quote based on discussions. Then send a finalized quote once the final designs are received.
  • If the client adds features. Send updated scope and price.
  • Larger projects require about 150-200 lines of bulleted functional specification.
  • Require layered PSDs.
  • Don’t accept designs in Illustrator or Indesign because of issues of 300dpi and CMYK confusing client expectations.
  • Uses WP101 for training.
  • On the Monday that the projects starts, send the client a “project starting” email explaining that you’re are starting the project and thank the client for providing all necessary resources. Also include information about billing and schedules in the email.
  • Link to a vanilla WordPress install with WP101 installed so they can get started learning how to use WordPress.
  • Provide detailed bulleted walk through of all the custom functionality provided eg. “Manage menu via Appearance->Menus”. Put this information in a Help tab in the WordPress admin. Also email a copy of these instructions to the client.
  • Designer works with client directly after discussing functional specificaitons with developer. The designer assists the client with the discovery and education phase. As a result need to know great designers.
  • Designer costs are roughly $1500 for a small site. So minimum budget for the whole site is $3500.
  • Regarding provided designs that aren’t WordPress friendly – Just go with it rather than try fight it. The client has usually been through a bunch of iterations by this stage and is now committed to the design.
  • Release open source code via Github rather than WordPress repository to avoid demands for support.
  • Populate content included in PSDs.
  • He is usually booked 4-8 weeks in advance.
  • Requires that designs are ready the Thursday before you start so that you can ask questions on the Friday.
  • If the designs are delayed, the project is rescheduled for the next available time.
  • Final invoice needs to be paid in 15 business days and before launch of the site.
  • Once site is launched client has 10 days to raise any issues related to the original scope of work. After that it’s an hourly rate for changes.
  • It’s up to the client to confirm everything is working before the site is launched.
  • Only use reliable plugins so you can tell the client to go ahead and update WordPress core and all plugins as needed.
  • He prefers clients pay for Typekit if needed.
  • He pays for Gravity Forms and WP101 plugins via a developer license.


Notes on “Level-Up Your WordPress Development Skills” by Tom McFarlin

These are my reference notes on Tom Mcfarlin’s presentation at WordCamp Altanta 2013, entitled Level-Up Your WordPress Development Skills.

Links


Quotes

  • Try to stay and the intersection of what you love doing and what you’re best at doing
  • Working as part of a team is more fun than working by yourself


On blogging

  • 30-45 minutes a day
  • 5 days a week
  • Approximately 300 words per post
  • Write first thing in the morning
  • Blogging begets blogging, the more you do it the easier it is
  • Evalute and filter ideas
  • Don’t be afraid of critism, becoming a better developer is a journey not a destination


WordPress Hooks

An easy to remember definition of the two types of WordPress hooks:

  • Filters allow you to manipulate the data
  • Actions allow you to insert your code when something happens


Four WordPress APIs not to be missed


Using the WordPress Codex

When searching for a solution to a problem:

  1. Search the WordPress Codex before searching Google
  2. Then search the WordPress Codex using Google


How to search for and replace escaped paths in a WordPress database

I recently migrated a website to the host WP Engine. Before the migration the site had WordPress installed in it’s own directory. The directory, in this case, was named wp.

WP Engine doesn’t allow this kind of directory setup, so I had to move all the WordPress files up to the root and then remove wp from all paths in WordPress’s MySQL database.

I used the PHP WordPress Search and Replace Tool to edit a copy of the database that I had imported to WP Engine.

Initially I did a search for the string mysite.com/wp and replaced all matches with mysite.com

Problem

This worked for everything except some escaped paths I found in the table created by the Slider Revolution plugin. The paths in this table looked like this:

{"image":"http:\/\/www.mysite.com\/wp\/wp-content\/uploads\/my-slider-image.jpg"}

Solution

To fix these escaped paths I had to search for the string mysite.com\\\/wp and replace all matches with mysite.com.

How to get the path to a file within a WordPress theme

There are two types WordPress functions that should be used when the getting the path to a parent or child theme directory.

Template functions are used for resources that are not intended to be over-ridden by a child theme.

  • get_template_directory()
  • get_template_directory_uri()

Stylesheet functions are used for resources that are intended to be over-ridden by a child theme.

  • get_stylesheet_directory()
  • get_stylesheet_directory_uri()


Returned values

These WordPress functions return one of the following

  • an absolute server path eg. /home/user/public_html/wp-content/themes/my_theme
  • a properly-formed URI ie. a web-address starting with http:// or https://

Note these functions do not return a trailing slash following the directory address.
 

Template functions

These functions retrieve the path to the directory that contains the theme templates. When using a child theme, these functions will refer to the parent theme.

get_template_directory()

Retrieves an absolute path to the directory of the current theme.
Use for including PHP files.

<?php include( get_template_directory() . '/includes/myfile.php'); ?>

get_template_directory_uri()

Retrieves a URI for the directory of the current theme.
Use for images, links, referencing additional stylesheets and javascript. Don’t use for loading PHP files or checking if a file exists.

<img src="<?php echo get_template_directory_uri() ?>/images/mypicture.png" />


Stylesheet functions

These functions retrieve the path to the directory that contains the currently activated stylesheet. When using a child theme, these functions will refer to the child theme.

get_stylesheet_directory()

Retrieves an absolute path to the directory that contains the stylesheet for the currently activated theme.
Use for including PHP files.

<?php include( get_stylesheet_directory() . '/includes/myfile.php'); ?>

get_stylesheet_directory_uri()

Retrieves a URI for the directory that contains the stylesheet for the currently activated theme.
Use for images, links, referencing additional stylesheets and javascript. Don’t use for loading PHP files or checking if a file exists.

<img src="<?php echo get_stylesheet_directory_uri() ?>/images/mypicture.png" />


References

From the WordPress Codex:

Notes on the “WordPress and Git” video series by Amelia Briscoe (Part 1)

These are my reference notes on the excellent video series WordPress and Git by Amelia Briscoe. Many thanks to Amelia for creating this series, sharing it and allowing me to post this summary. This post covers the first four videos. My second post (Part 2) will cover the last five videos.

Links

Contents


Video 1. Importing a WordPress Git Repository

Mark Jaquith’s WordPress Skeleton –  A basic layout of a WordPress Git repository

Features of WordPress Skeleton

  • Latest version of WordPress is in the sub module wp
  • All the content (themes, plugins and “must use” plugins) are in the content folder
  • .gitignore tells git to ignore certain files
  • .htaccess
  • local-config-sample.php
  • wp-config.php

Importing WordPress Skeleton into Bitbucket

  • Select Import an existing repository in Bitbucket
  • Copy the URL of WordPress Skeleton (https://github.com/markjaquith/WordPress-Skeleton.git) and paste it into the URL for the Old repository on Bitbucket
  • Enter a name and description for the New repository and click Import repository


Video 2. Clone a WordPress Git Repository to a local server

Forking the repository for local use

  • When importing is finished, fork the new Bitbucket repo for use in local environment by clicking the Fork button near the search bar
  • On the next page, enter a name (eg. development-repo) and description for the repo and click Fork
  • Once the forking is complete, copy the HTTPS URL for the newly forked repo from the top right hand corner of the screen
  • Open the git terminal and navigate to the folder that you want clone the repository into (eg. C:\xampp\htdocs)
  • Run your own version of the following git command
git clone --recursive https://benpearson@bitbucket.org/benpearson/development-repo.git wp_development

Explanation of the git clone command

  • recursive tells git to clone the sub module wp in the WordPress Skeleton as well.
  • https://benpearson@bitbucket.org/benpearson/development-repo.git is the HTTPS URL of the repo to be cloned.
  • wp_development is the name of the folder that will be created for the cloned repo. If this argument is omitted git will give the folder the same name as the repo.

Finish cloning repo and create a database

  • Enter Bitbucket password and wait for cloning to complete (takes a couple of minutes)
  • Open phpMyAdmin on your local server and create a database and user for the WordPress install.


Video 3. Configure the WordPress Git Repository

Consider the following code from the top of the wp-config.php in the newly cloned local repo.

if ( file_exists( dirname( __FILE__ ) . '/local-config.php' ) ) {
    define( 'WP_LOCAL_DEV', true );
    include( dirname( __FILE__ ) . '/local-config.php' );
} else {
    define( 'WP_LOCAL_DEV', false );
    define( 'DB_NAME', '%%DB_NAME%%' );
    define( 'DB_USER', '%%DB_USER%%' );
    define( 'DB_PASSWORD', '%%DB_PASSWORD%%' );
    define( 'DB_HOST', '%%DB_HOST%%' ); // Probably 'localhost'
}

This code looks for the file local-config.php. If it exists, the database information contained in the file in local-config.php is used. If it does not exist, the database information listed below the conditional (above) is used. The file local-config.php will not exist in the repository because it is listed in the .gitignore file.

.gitignore also contains /content/upgrade/ so that any WordPress upgrades made in the local environment will not be pushed to the repo

Setting up the config files

  • Create a copy of local-config-sample.php and rename it local-config.php
  • Open the new created local-config.php and enter the local database name, user name and password.
  • Open wp-config.php and find the Custom Content Directory section. Edit the following line to include your local folder name
define( 'WP_CONTENT_URL', 'http://' . $_SERVER['HTTP_HOST'] . '/content' );

Should be changed to something like following (where wp_development is the name of my local folder)

define( 'WP_CONTENT_URL', 'http://' . $_SERVER['HTTP_HOST'] . '/wp_development/content' );
  • It may be necessary to increase the PHP memory limit. This done by adding the following constant definition above the Custom Content Directory section in wp-config.php
define('WP_MEMORY_LIMIT', '96M');


Video 4. Installing WordPress from a Git Repository

  • Running git status now in our repo folder will report that wp-config.php has been modified and it is not yet staged
  • Run git add . to add everything to the staging area
  • Run git commit -m "Changes to the wp-config file"
  • Open your own version of the URL localhost/wp_development/wp/wp-admin in a browser. This should open the 5 minute WordPress installation screen.
  • Complete installation as usual and login
  • Go to Settings->General in the WP dashboard and remove the wp from the end of the Site Address (URL).
  • Update permalinks to your desired structure
  • Opening the termial and running git status now will report that .htaccesshas been modified
  • Run git add .

You may get the following message if using Windows:

warning: LF will be replaced by CRLF in .htaccess
The file will have its orginal line endings in your working directory

In Unix systems the end of a line is represented with a line feed (LF). In windows a line is represented with a carriage return (CR) and a line feed (LF) thus (CRLF). When you get code from git that was uploaded from a unix system they will only have a LF. It’s nothing to worry about. More information on this warning from stackoverflow

  • Run git commit -m "Updated permalinks"
  • Run git log --oneline -5 to display the information for the last 5 commits, one per line.
  • Run git push to push the changes to your Bitbucket repository.

Setting up Mixture to work with WordPress and Compass

Assuming you have Mixture and XAMPP (or similar local server) installed and your WordPress site is already working locally.

  • Make sure there’s no existing compass folder or config.rb file in your theme folder.
  • Start XAMPP (or other local server).
  • Start Mixture.
  • Click Open in Mixture and select your theme folder inside wp-content/themes
  • Select your theme folder for the Preprocessor location.
  • Enter your localhost URL for the Partner server address, in my case it’s http://localhost

Mixture will now report errors. Here’s how to fix them.

Assuming you have the following file structure in your theme folder:

WordPress theme file structure example

  • style.css in the root of the theme that only contains theme information header, an @import statement for your “global” css file (that contains all your styles) and maybe also an @import statement for your parent theme’s stylesheet if you are working on a child theme. Here’s an example style.css for a child theme:
/*
Theme Name:     Twenty Twelve Child
Description:    Child theme for the Twenty Twelve theme 
Author:         Ben Pearson
Author URI:     http://benpearson.com.au
Template:       twentytwelve
Version:        1.0
*/

@import url("../twentytwelve/style.css");

@import url("css/global.css");
  • All your SCSS files are kept in the an scss folder. I have a global.scss file in this folder that imports all the partials like _navigation.scss. This global.scss will be compiled to css/global.css and then imported by style.css
  • All your CSS will the exception of style.css is kept/compiled in a css folder.
  • All your images are kept in an images folder
  • All your javascript is kept in an js folder

Open the mixture.json file that has been newly created in your theme’s root folder and make the following change:

"useCompass": true,

This will create a compass folder in your theme folder with a config.rb file inside it.

Now change the preprocessorLocations in mixture.json to the root like so:

"preprocessorLocations": "/",

Open compass/config.rb and change the CSS, SCSS, images and javascript paths to the following:

css_dir = "css"
sass_dir = "scss"
images_dir = "images"
javascripts_dir = "js"

Click View locally in Mixture to view your site through Mixture and take advantage of it’s SASS/Compass compiler and live reload functionality.


Using Mixture with a virtual host (optional)

The following instructions work on Windows 7. They may also work on other operating systems.

Assuming you have already setup a virtual host.

Make the following changes to mixture.json, substituting bp.benpearson for the name of your virtual host.

"serverHostname": "bp.benpearson",
"serverPort": 80,
"simpleModePartnerServer": "http://bp.benpearson/",

When you click View locally in Mixture it will open the site at a URL like:

http://bp.benpearson:63229/

The :63229 is there because that’s the port that Mixture is using. To get rid of this you need to make sure port 80 is free for Mixture to use. In my case port 80 is being used by XAMPP.


References

Create a unstyled linked list of all tags used in a WordPress blog

Need a tag cloud without all the styles? Just a simple unstyled, linked list of all the tags used throughout a blog?

Try the wp_list_categories() function. Weird, I know. The taxonomy parameter of the function enables it to list post tags instead of categories.

The following displays a linked list of all the post tags sorted by popularity.

<ul>
    <?php wp_list_categories( array( 'taxonomy' => 'post_tag',
                                     'orderby' => 'count',
                                     'order' => 'DESC',
                                     'title_li' => '' ) ); ?>
</ul>

The empty title_li parameter is necessary to remove the default “Categories” title and it’s outer ul wrap.

Reference: wp list categories() is the WordPress Codex.

Replace a non pluggable function in a WordPress parent theme with a customized function in the child theme

A pluggable function is a a function wrapped in a function_exists() call eg.

<?php 
if ( ! function_exists( 'my_pluggable_function' ) ) {
    function my_pluggable_function() {
        /* Some code goes here */
    }
}
?>

When using a child theme, you can override pluggable functions by defining them first in your child theme’s functions.php file. The child theme’s functions.php file is included before the parent theme’s file, so the child theme functions would be used.

If the functions that are not pluggable are instead attached to a filter or action hook you can replace them using the following method in the child theme’s functions.php. I have used the example of the widgets_init action.

  1. Unhook the parent theme’s widget function (declared in the parent theme’s functions.php) from the widgets_init action
  2. Create a customized function to register widget areas for the child theme
  3. Hook our new function to the widgets_init action

Again, this code would go in the child theme’s functions.php with no need to modify the parent theme’s functions.php.

<?php 
remove_action( 'widgets_init', 'parenttheme_widgets_init' );

function childtheme_widgets_init() {
    /* Some code to register widget areas goes here */
}

add_action( 'widgets_init', 'childtheme_widgets_init' );
?>